
75 Gallon Turtle Tank Setup: Complete Guide for a Healthy Turtle Habitat

Setting up a proper turtle habitat is one of the most important steps in keeping aquatic turtles healthy and active. Many beginners underestimate how much space turtles need, which often leads to overcrowded tanks and poor water quality. If you are new to turtle keeping, you may also want to read our complete guide on choosing the best turtle tanks for beginners, which explains how to select the right tank size and equipment.
A 75 gallon turtle tank is widely considered one of the best tank sizes for medium to large aquatic turtles. It provides enough swimming space, allows strong filtration systems to work efficiently, and gives room to build a proper basking platform.
Species like the Red‑Eared Slider are messy eaters and produce a large amount of waste, so a well designed tank setup is critical for maintaining clean water and preventing health issues.
In this guide, you will learn exactly how to create a fully functional 75 gallon turtle tank setup, including filtration, lighting, basking areas, and maintenance routines.
Why a 75 Gallon Tank Is Ideal for Turtles

Turtles grow much larger than most new owners expect. A hatchling may be only a few inches long, but many aquatic species can grow between 8 and 12 inches as adults.
A common guideline among turtle keepers is the 10 gallon rule:
10 gallons of water for every inch of turtle shell length.
For example:
• 6 inch turtle → 60 gallon tank
• 8 inch turtle → 80 gallon tank
• 10 inch turtle → 100 gallon tank
A 75 gallon aquarium sits in a great middle range. It offers enough space for most adult turtles while still being manageable for home setups.
Benefits of a 75 gallon turtle tank include:
• larger swimming area for natural behavior
• more stable water quality
• room for powerful filtration systems
• space to install a proper basking platform
When designed correctly, a 75 gallon tank can comfortably house one adult turtle for many years.
75 Gallon Turtle Tank Guide: Essential Equipment
Before setting up your turtle habitat, it is important to gather the correct equipment. Using proper equipment from the beginning will prevent many common turtle tank problems such as cloudy water or shell health issues.
Essential equipment includes:
Tank
A 75 gallon glass aquarium or large reptile tank.
Stand
A sturdy aquarium stand designed to support heavy weight.
Filtration system
A powerful canister filter rated for tanks larger than 75 gallons.
Basking platform
A dry platform where the turtle can leave the water completely.
Heat lamp
Provides warmth for basking and shell health.
UVB light
Essential for calcium metabolism.
Water conditioner
Removes chlorine from tap water.
Thermometer
Helps monitor water and basking temperatures.
These items create the foundation of a safe and healthy turtle environment.
75 Gallon Turtle Tank Setup Guide: Best Filters
Filtration is the most important component of any turtle tank setup. Turtles produce far more waste than fish, which means the filter must be powerful enough to keep the water clean.
A good rule is to use a filter rated for 2 to 3 times the tank size.

For a 75 gallon turtle tank, this means choosing a filter designed for 150 to 200 gallons.
Below is a comparison of some of the most commonly recommended canister filters used in turtle tanks.
| Filter | Tank Rating | Flow Rate | Best For |
|---|---|---|---|
| Fluval FX4 | Up to 250 gallons | ~700 GPH | Excellent power and reliability |
| Penn-Plax Cascade 1500 | Up to 200 gallons | ~350 GPH | Budget friendly option |
| SunSun HW-304B | Up to 150 gallons | ~525 GPH | Good beginner canister filter |
| Fluval FX6 | Up to 400 gallons | ~925 GPH | Heavy duty turtle filtration |
These filters provide strong mechanical, chemical, and biological filtration, which helps maintain clear water and healthy bacteria colonies.

Many experienced turtle keepers prefer oversized filters because they reduce cleaning frequency and maintain better water quality.
Step 1: Positioning the Aquarium
Before filling your aquarium with water or installing equipment, choosing the right location for the tank is extremely important. The position of your aquarium affects not only the safety of your home but also the long term health of your turtle and the stability of the entire setup.
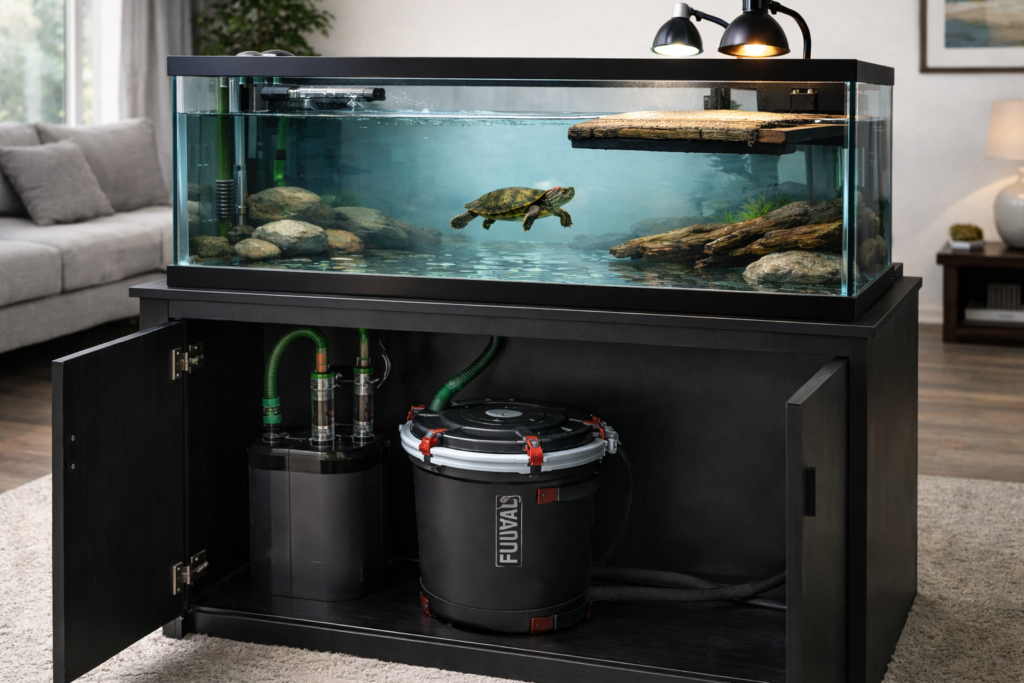
A 75 gallon turtle tank is significantly heavier than most people expect. When filled with water, decorations, filtration equipment, and the aquarium glass itself, the total weight can reach 800 to 900 pounds. Because of this, the tank must always be placed on a strong stand that is specifically designed to support aquariums. Regular household furniture such as tables, dressers, or cabinets are rarely built to hold this much weight and can eventually bend, crack, or collapse over time.
Using a proper aquarium stand ensures that the weight of the tank is evenly distributed across the entire base of the aquarium. Uneven support can put stress on the glass panels and seams, which may eventually lead to leaks or structural damage. Aquarium stands are designed to provide stable support while also leaving space underneath for equipment like canister filters, which are commonly used in turtle tanks.
Another critical factor when positioning the aquarium is choosing a location with a flat and level floor surface. Even a slight tilt can cause uneven pressure on the aquarium glass. Over time, this uneven stress can weaken the seams and increase the risk of cracks or leaks. Before placing the tank, it is always a good idea to use a simple level tool to make sure the surface is completely flat.
Direct sunlight is another factor many new turtle keepers overlook. Placing an aquarium near windows where it receives direct sunlight can cause several problems. Sunlight can rapidly heat the water during the day, causing temperature fluctuations that stress turtles and beneficial bacteria in the tank. In addition, strong sunlight often leads to excessive algae growth, which can turn the tank water green and require more frequent cleaning. To avoid these issues, it is best to position the aquarium in an area that receives normal indoor lighting rather than direct sun exposure.
Access to electrical outlets is also essential when planning your tank placement. A typical turtle aquarium setup requires multiple pieces of equipment that need power, including a canister filter, heat lamp, UVB lighting, and sometimes water heaters or additional circulation pumps. Placing the tank close to a reliable power source makes it easier to connect all necessary equipment safely. Using a surge protected power strip can also help organize cables and protect electrical devices.
Another important consideration is leaving adequate space behind the aquarium. Many turtle tanks use canister filters, which rely on intake and output tubes that run between the tank and the filter unit. These hoses typically extend from the back of the aquarium to the filter located inside the stand or beside the tank. If the aquarium is pushed tightly against a wall, installing or maintaining these tubes becomes difficult. Leaving a few inches of space behind the tank allows proper routing of tubing and makes future maintenance much easier.
Accessibility should also be considered when choosing the tank location. You will need to perform regular maintenance tasks such as water changes, filter cleaning, and equipment adjustments. Placing the aquarium in a location where you can easily reach the top of the tank and access the filter system will make routine care much more convenient.
Finally, always avoid placing aquariums on weak furniture, unstable platforms, or uneven flooring. Even if the tank appears stable at first, the constant pressure of hundreds of pounds over time can cause structural failure. A proper aquarium stand placed on a level floor is the safest and most reliable option.
By carefully selecting the right location before setting up your aquarium, you create a stable foundation for the entire habitat. Proper positioning ensures that your turtle tank remains safe, accessible, and easy to maintain for many years to come.
Step 2: Installing the Filtration System
Once the aquarium is properly positioned, the next and most critical step in setting up a turtle tank is installing a reliable filtration system. Filtration plays a central role in maintaining water quality, controlling waste buildup, and creating a healthy environment for your turtle. Compared to fish, aquatic turtles produce a significantly larger amount of waste because they eat heavily, often tear apart their food, and release waste directly into the water. Without a strong filtration system, turtle tanks can quickly become dirty, cloudy, and unhealthy. Because turtles produce a large amount of waste, choosing the right filter is essential. If you want a deeper breakdown of filtration types and sizing, check our complete turtle tank filtration guide.
For a 75 gallon turtle tank, choosing the right filter is essential. Most experienced turtle keepers recommend using a filter rated for at least two to three times the size of the tank. This means a filter designed for 150 to 200 gallons is ideal for a 75 gallon turtle aquarium. Oversized filtration provides stronger water circulation and better waste removal, which helps maintain clearer water and reduces how often the tank needs to be cleaned.
The most commonly recommended filtration system for turtle tanks is a canister filter. Unlike internal filters that sit inside the aquarium, canister filters are external systems that operate outside the tank, usually inside the aquarium stand. These filters pull water out of the aquarium through an intake tube, pass it through several layers of filtration media, and then return clean water back into the tank through an output nozzle.
Canister filters are particularly effective because they provide three types of filtration, each serving a different purpose.
The first type is mechanical filtration. Mechanical filtration removes physical debris from the water, such as leftover food, turtle waste, and floating particles. Inside the filter, water typically passes through sponges or filter pads that trap these solid materials. This helps prevent debris from circulating back into the tank and keeps the water visually clear.
The second type is biological filtration, which is essential for maintaining a stable aquatic environment. Biological filtration relies on beneficial bacteria that grow on specialized filter media such as ceramic rings or bio balls. These bacteria help break down harmful waste compounds produced by turtles. When turtles release waste into the water, it produces ammonia, which can be toxic if it accumulates. Beneficial bacteria convert ammonia into nitrite and eventually into nitrate, which is less harmful and can be controlled through regular water changes. A strong biological filtration system is one of the most important elements of a healthy turtle tank.
The third type is chemical filtration, which uses materials such as activated carbon to remove dissolved impurities from the water. Chemical filtration can help remove odors, discoloration, and certain toxins, improving overall water clarity. While not always essential, chemical filtration can be useful in maintaining cleaner water in heavily stocked turtle tanks.
Installing the filtration system usually begins with placing the canister filter in the cabinet or stand below the aquarium. The intake tube is placed inside the tank, typically near one corner, where it pulls water down into the filter. The output tube returns filtered water back into the aquarium, creating circulation throughout the tank. Good water circulation helps distribute oxygen, prevents stagnant areas, and keeps debris moving toward the filter intake.
When setting up the intake tube, it should be positioned low enough to collect debris from the water but not so low that it becomes blocked by substrate or decorations. The output nozzle should be angled to create gentle surface movement, which helps improve oxygen exchange in the tank.
After connecting the hoses and installing the filtration media inside the filter, the canister filter is usually filled with water and primed according to the manufacturer’s instructions. Once powered on, the filter will begin circulating water through the system continuously.
It is important to remember that filtration systems should run 24 hours a day. Turning the filter off for extended periods can harm the beneficial bacteria that maintain the biological filtration process.
A well installed canister filter dramatically improves water quality, reduces odor, and helps maintain a stable aquatic environment for turtles. By choosing a powerful filter and setting it up correctly, you create a strong foundation for the long term health and cleanliness of your 75 gallon turtle tank.
Step 3: Adding Water to the Tank
After installing the filtration system and confirming that all equipment is properly connected, the next step is filling the aquarium with water. While this may seem simple, adding water correctly is important for maintaining a safe and stable environment for your turtle.
Most turtle tanks are typically filled between 75 percent and 90 percent of the tank’s total height. This allows enough water for turtles to swim freely while still leaving space above the waterline for basking platforms, lighting equipment, and tank decorations. Aquatic turtles are strong swimmers, so deeper water is generally beneficial as long as they can easily reach the surface to breathe.
When filling the aquarium, it is best to add water slowly to avoid disturbing decorations or equipment inside the tank. Some turtle keepers place a plate or bowl on the tank floor while pouring water, which helps disperse the flow and prevents strong water pressure from moving substrate or rocks.
One of the most important steps when adding water is using a water conditioner. Tap water in many areas contains chlorine or chloramine, which are chemicals added to municipal water supplies to kill bacteria. While these chemicals make water safe for human use, they can irritate turtles and harm the beneficial bacteria that help maintain biological filtration inside the tank.
A quality water conditioner neutralizes chlorine and chloramine almost instantly, making the water safe for turtles and the filtration system. Simply add the recommended amount of conditioner based on the total volume of water being used.
Water depth should also be appropriate for the size of your turtle. A common guideline among turtle keepers is that water depth should be at least twice the length of the turtle’s shell. This ensures that turtles have enough space to swim naturally and turn themselves upright if they flip over.
Once the tank is filled and conditioned, allow the filter to run for a while so the water begins circulating properly throughout the system. This helps stabilize the tank and prepares it for the next steps of building a healthy turtle habitat.
Step 4: Creating a Basking Area

AA proper basking area is one of the most important parts of any turtle tank setup. Aquatic turtles spend a significant amount of time in the water, but they also need a completely dry space where they can climb out of the water and rest. This behavior is called basking, and it plays a vital role in maintaining a turtle’s overall health. Choosing the right basking platform is important for shell health and proper temperature regulation. You can read our full guide on selecting the best turtle basking docks for different tank sizes.
In the wild, turtles regularly climb onto rocks, logs, or riverbanks to bask under the sun. Replicating this behavior in a home aquarium is essential for species such as the Red-Eared Slider. Without a proper basking area, turtles may develop shell problems, weakened immune systems, and other health complications.
The basking platform should allow the turtle to completely leave the water and dry off fully. If the turtle’s shell remains wet, it cannot properly regulate temperature or absorb beneficial UVB light. A dry basking area helps prevent issues such as shell rot and fungal growth.
There are several types of basking platforms commonly used in turtle tanks.
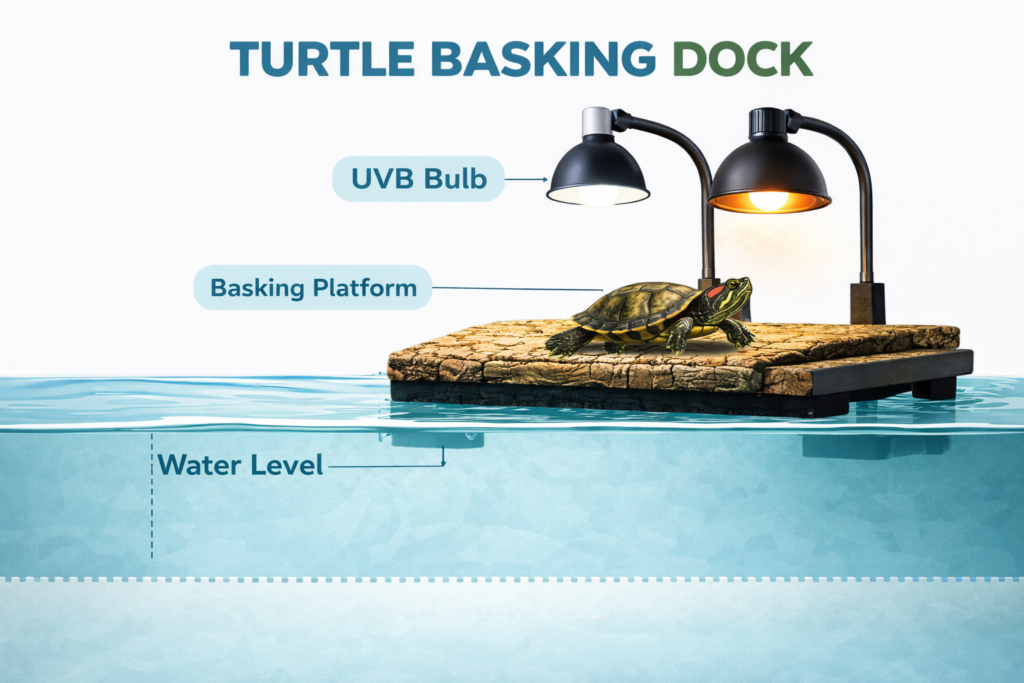
One popular option is a floating turtle dock. These docks attach to the sides of the aquarium using suction cups and float on the surface of the water. As the water level changes, the dock rises and falls with it, allowing the turtle to easily climb onto the platform.
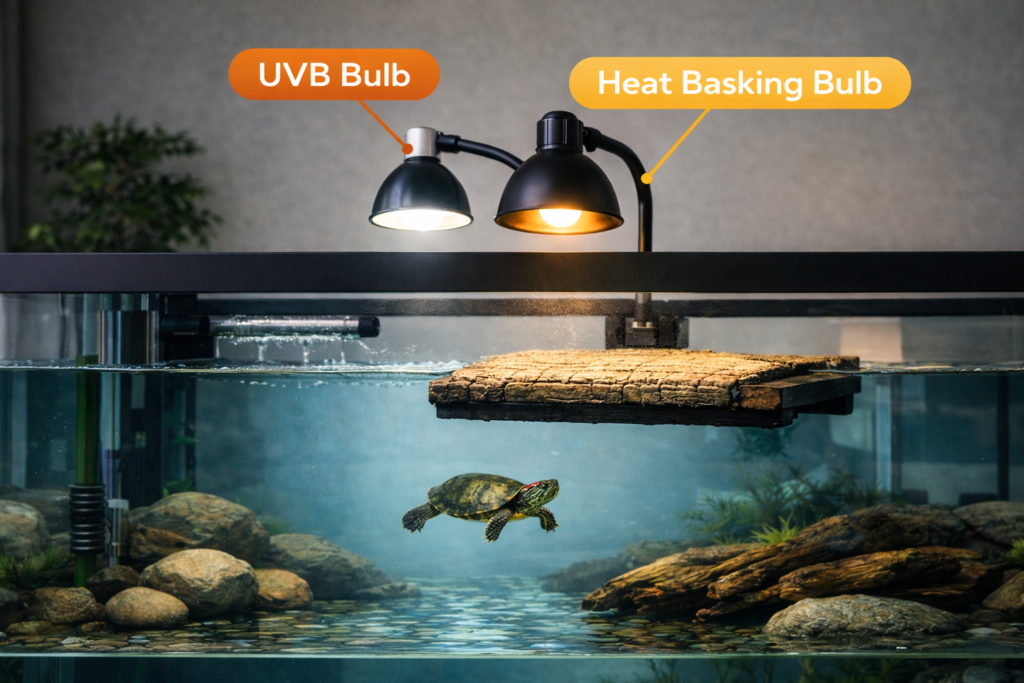
Another option is an above tank basking platform. These platforms sit above the aquarium and allow the tank to be filled with more water, increasing swimming space. Many turtle keepers prefer above tank basking areas because they maximize the usable water volume while still providing a large dry basking spot.
Some hobbyists also build DIY basking platforms using materials such as egg crate panels, acrylic sheets, or sturdy plastic grids. DIY platforms can be customized to fit specific tank dimensions and often provide more space for larger turtles.
Regardless of the type of platform used, the basking area should have a gentle ramp or slope that allows the turtle to climb out of the water easily. The surface should also be stable and strong enough to support the turtle’s full weight without tipping or shifting.
Positioning the basking platform correctly inside the tank is also important. The basking area should be located under both the heat lamp and the UVB light, which are essential for proper thermoregulation and shell health. When the turtle climbs onto the platform, it should be able to sit directly under these lights.
The basking surface temperature should generally reach around 90 to 95°F (32 to 35°C). This warm environment encourages turtles to bask regularly, which supports digestion, metabolism, and immune system function.
Finally, ensure that the basking area remains completely dry and easily accessible. If the platform becomes submerged or difficult to climb, turtles may stop using it altogether. A well designed basking area encourages natural behavior and contributes greatly to the long term health of your turtle.
Step 5: Installing UVB and Heat Lighting
Lighting is a critical part of a healthy turtle tank setup, yet it is one of the most commonly misunderstood aspects for beginners. Aquatic turtles may live in water, but they rely heavily on sunlight in their natural environment. In captivity, proper lighting must replicate these natural conditions to keep turtles healthy and active. Proper lighting is essential for turtle health. If you want to understand lighting requirements in detail, read our guide on UVB lighting for turtle tanks.
Two types of lighting are essential in a turtle tank: UVB lighting and heat lighting. Both lights serve different but equally important purposes, and they should always be used together above the basking area.
UVB lighting plays a key role in helping turtles process calcium. In the wild, turtles absorb ultraviolet B radiation from sunlight when they bask on rocks or logs. This UVB exposure allows their bodies to produce vitamin D3, which helps them absorb calcium from their food. Calcium is necessary for maintaining strong bones and healthy shells.
Without adequate UVB lighting, turtles cannot properly process calcium, even if their diet contains enough of it. Over time, this deficiency can lead to serious health problems such as weak bones, soft shells, and deformities. One of the most common conditions caused by a lack of UVB exposure is Metabolic Bone Disease, which affects many reptiles kept without proper lighting.
UVB bulbs designed for reptiles should always be placed above the basking area so that the turtle receives UV exposure while it rests out of the water. These bulbs are usually mounted in a lamp fixture positioned above the basking platform. It is important to ensure that the light is not blocked by glass or plastic, since these materials can filter out UVB rays.
In addition to UVB lighting, turtles also require a heat lamp. The heat lamp creates a warm basking spot that allows turtles to regulate their body temperature. Unlike mammals, turtles are ectothermic animals, meaning they rely on external heat sources to control their body temperature.
When turtles climb onto the basking platform, the heat lamp warms their bodies, helping them digest food properly and maintain normal metabolic functions. Without a warm basking area, turtles may become lethargic, stop eating, or develop digestive problems.
The basking area temperature should generally be maintained between 90 and 95°F (32 to 35°C). This temperature encourages turtles to bask regularly and helps replicate the warmth they would receive from natural sunlight.
Lighting should follow a consistent daily schedule to mimic natural day and night cycles. Most turtle keepers keep both the UVB light and heat lamp on for about 10 to 12 hours per day. Using an automatic timer can make this process easier by turning the lights on and off at the same time every day.
Another important factor to remember is that UVB bulbs lose their effectiveness over time. Even if the bulb still produces visible light, the UVB output gradually decreases. For this reason, UVB bulbs should typically be replaced every six months to ensure turtles continue receiving proper UV exposure.
Proper lighting supports shell growth, bone strength, digestion, and overall turtle health. By installing both UVB and heat lighting above the basking platform, you create an environment that closely mimics the natural sunlight turtles depend on in the wild.
Step 6: Substrate and Tank Decoration

Once the filtration system, water, basking area, and lighting are in place, the next step is deciding whether to add substrate and decorations to your turtle tank. While decorations can make the aquarium look more natural and visually appealing, they should always be chosen carefully to ensure they remain safe for your turtle.
Unlike fish aquariums, turtle tanks do not require substrate to function properly. In fact, many experienced turtle keepers prefer using a bare bottom tank, especially in larger setups like a 75 gallon aquarium. A bare bottom tank means the bottom glass of the aquarium is left uncovered without gravel, sand, or other materials.
There are several advantages to keeping a bare bottom turtle tank. First, it makes cleaning significantly easier. Turtle tanks accumulate waste quickly, and without substrate, debris such as leftover food and turtle waste can be easily spotted and removed during water changes. Second, a bare bottom tank prevents turtles from accidentally swallowing small pieces of gravel or substrate, which can sometimes cause digestive issues or blockages.
However, if you prefer a more natural looking aquarium, substrate can still be used safely as long as the correct materials are chosen. The most commonly recommended substrate for turtle tanks is large river rocks or smooth stones. These rocks should be significantly larger than the turtle’s head so that they cannot be swallowed. Large stones also create a natural riverbed appearance and provide additional surfaces for beneficial bacteria to grow.
Another option some keepers use is sand, although this can sometimes be stirred up by turtles digging or swimming vigorously. If sand is used, it should be aquarium safe sand and kept in a thin layer to avoid excessive buildup of waste underneath.
Decorations can also enhance the environment and provide enrichment for turtles. Safe decorative elements include:
• large pieces of driftwood
• smooth aquarium safe rocks
• sturdy artificial plants
• turtle safe aquatic plants
Driftwood is particularly popular because it creates a natural habitat appearance and can provide additional climbing or resting areas for turtles. Artificial plants can also help make the tank feel more natural, although turtles may occasionally nibble on them or move them around.
When adding decorations, it is important to avoid overcrowding the tank. Turtles are active swimmers and need plenty of open space to move freely. Large tanks like 75 gallon aquariums should prioritize swimming space over excessive decorations. Placing a few carefully selected decorations along the sides of the tank while leaving the center open is usually the best approach.
You should also avoid decorations with sharp edges or narrow openings where a turtle might become trapped. All items placed inside the aquarium should be stable and heavy enough that the turtle cannot easily knock them over.
Finally, remember that turtles are curious animals and often rearrange their environment by pushing rocks or decorations around the tank. Because of this, decorations should always be placed securely to prevent accidents or damage to the aquarium glass.
By choosing safe substrate and minimal decorations, you can create an aquarium that is both visually appealing and easy to maintain while still providing plenty of swimming space for your turtle.
Step 7: Cycling the Tank
Before introducing your turtle into the aquarium, it is important to allow the tank to run for a short period so the filtration system can begin establishing beneficial bacteria. This process is known as cycling the tank, and it plays a crucial role in maintaining stable and healthy water conditions.
In any aquatic environment, waste materials naturally break down and release harmful compounds into the water. In a turtle tank, this waste usually comes from turtle droppings, uneaten food, and decaying organic matter. As these materials break down, they produce ammonia, which is highly toxic to aquatic animals if it accumulates in the water.
To prevent ammonia from reaching dangerous levels, aquariums rely on beneficial bacteria that grow inside the filtration system and on surfaces within the tank. These bacteria help convert harmful waste products into less dangerous substances through a natural biological process called the nitrogen cycle.
The nitrogen cycle occurs in several stages.
First, waste in the tank produces ammonia. Ammonia is toxic even at relatively low concentrations and can irritate a turtle’s skin, eyes, and respiratory system if it builds up.
Next, a group of beneficial bacteria begins converting ammonia into nitrite. While this is a step in the right direction, nitrite is still harmful and must continue to be broken down.
Finally, another type of beneficial bacteria converts nitrite into nitrate, which is significantly less toxic. Nitrate can then be controlled through regular water changes and proper tank maintenance.
Cycling the tank allows these beneficial bacteria colonies to establish themselves inside the filter media and on surfaces throughout the aquarium. Once the bacteria population grows strong enough, the filtration system can effectively process waste and maintain stable water conditions.
In many fish aquariums, the cycling process can take several weeks. However, turtle tanks are often cycled more gradually because turtles are introduced slowly and the filtration system continues developing bacteria over time. Even allowing the tank to run for a few days before adding your turtle can help the filtration system begin stabilizing.
To start the cycling process, simply run the filter continuously after filling the aquarium and installing all equipment. The constant flow of water through the filter allows bacteria to begin colonizing the filtration media. Over time, these bacteria grow naturally as waste begins to appear in the tank.
Some turtle keepers also introduce small amounts of beneficial bacteria using bottled bacterial supplements designed for aquariums. These products can help speed up the development of the nitrogen cycle, although they are not always necessary.
During the early stages of a new tank, it is especially important to monitor water quality and perform partial water changes when needed. This helps prevent ammonia and nitrite from reaching harmful levels while the biological filtration system continues to develop.
Cycling the tank creates a balanced aquatic environment where beneficial bacteria help process waste naturally. By allowing this process to begin before fully stocking the tank, you build a stronger and more stable habitat that will support your turtle’s health over the long term.
Step 8: Maintenance Routine for a 75 Gallon Turtle Tank
Even with a powerful filtration system and a properly designed habitat, regular maintenance is essential to keep a turtle tank clean and healthy. Aquatic turtles produce a large amount of waste, and leftover food can quickly break down in the water if it is not removed. Establishing a consistent maintenance routine helps maintain clear water, prevents harmful bacteria buildup, and keeps your turtle comfortable in its environment. Feeding turtles properly can also reduce tank waste. Learn more about proper feeding in our turtle diet guide.
A well maintained 75 gallon turtle tank does not require constant cleaning, but it does benefit from a simple schedule of weekly and monthly care tasks. By following a routine, you can prevent most common tank problems before they start.
One of the most important maintenance tasks is performing partial water changes. Over time, waste compounds such as nitrate accumulate in the water even when a filter is working properly. A partial water change helps dilute these substances and refresh the water quality.
For most turtle tanks, changing 20 to 30 percent of the water each week is usually sufficient. During a water change, remove a portion of the aquarium water using a siphon or aquarium vacuum and replace it with fresh, conditioned water. Always remember to treat new tap water with a water conditioner before adding it to the tank to remove chlorine and chloramine.
Another important weekly task is removing uneaten food and visible debris from the tank. Turtles are messy eaters and often tear their food apart, leaving small pieces floating or sinking to the bottom. These food particles can quickly decay and create cloudy water if they are not removed. Using a small net or siphon during water changes makes it easy to remove leftover food.
Checking the filtration system regularly is also an important part of maintenance. Make sure the filter is running smoothly and that water is flowing properly through the intake and output tubes. If the water flow becomes noticeably weaker, it may be a sign that the filter media needs cleaning.
In addition to weekly care, turtle tanks also benefit from monthly maintenance tasks. About once a month, the filter media should be gently rinsed to remove accumulated debris. When cleaning filter media, it is best to rinse it using water taken from the aquarium rather than tap water. Tap water can contain chlorine, which may harm the beneficial bacteria living in the filter.
During monthly maintenance, it is also a good idea to inspect other parts of the tank setup. Check that the basking platform remains stable, verify that the heat lamp and UVB light are functioning properly, and make sure all electrical connections remain secure.
Cleaning the aquarium glass may also be necessary if algae begins forming on the tank walls. A simple aquarium algae scraper or sponge can easily remove algae without disturbing the turtle.
Finally, keeping a consistent feeding schedule and avoiding overfeeding can greatly reduce tank maintenance. Feeding turtles only what they can consume within a few minutes helps prevent excess food from breaking down in the water.
By following a simple maintenance routine, you can keep your turtle tank clean, balanced, and easy to manage. Regular care not only improves water quality but also creates a healthier and more comfortable habitat where your turtle can thrive for many years.
Common Mistakes in 75 Gallon Turtle Tanks
Setting up a turtle tank may seem straightforward, but many beginners make mistakes that can lead to poor water quality, unhealthy turtles, or unnecessary maintenance problems. A 75 gallon turtle tank provides a great amount of space for aquatic turtles, but the setup must still be done properly to ensure the environment remains stable and safe.
Understanding the most common mistakes can help turtle keepers avoid problems and create a habitat that supports the long term health of their pets.
Using an Undersized Filter
One of the most common mistakes new turtle owners make is using a filter that is designed for fish tanks rather than turtles. Fish generally produce much less waste than turtles, so filters that work well for fish aquariums are often not powerful enough for turtle tanks.
Turtles are messy eaters and produce a large amount of waste, which can quickly overwhelm a weak filtration system. When the filter is too small, water may become cloudy, develop unpleasant odors, or accumulate harmful waste compounds.
For a 75 gallon turtle tank, it is always best to use a filter rated for at least 150 to 200 gallons. Oversized filtration helps maintain clearer water, improves circulation, and reduces the frequency of deep cleaning.
Not Providing a Proper Basking Area
Another common mistake is failing to provide a proper basking platform where the turtle can completely leave the water. Aquatic turtles depend on basking to regulate body temperature, dry their shells, and absorb beneficial UVB radiation.
If the basking area is too small, unstable, or partially submerged, turtles may stop using it altogether. This can lead to shell problems, skin infections, and other health issues.
The basking platform should allow the turtle to fully dry its shell and should be positioned directly under the heat lamp and UVB lighting.
Skipping UVB Lighting
Many beginners assume that turtles only need water and food to stay healthy, but proper lighting is just as important. Without UVB lighting, turtles cannot process calcium properly, even if their diet contains enough nutrients.
Over time, this can lead to serious health problems such as soft shells, weak bones, and deformities. One of the most common conditions caused by a lack of UVB exposure is Metabolic Bone Disease.
Installing a UVB bulb above the basking area and replacing it every six months helps prevent these issues and supports proper shell development.
Overfeeding Turtles
Overfeeding is another mistake that often leads to water quality problems. Turtles are opportunistic eaters and will continue eating as long as food is available. However, feeding too much food not only affects the turtle’s health but also creates excess waste that quickly pollutes the water.
Uneaten food can sink to the bottom of the tank and begin decomposing, which increases ammonia levels and contributes to cloudy water.
A good rule is to feed turtles only what they can eat within a few minutes. Maintaining a consistent feeding schedule also helps control waste buildup in the tank.
Overcrowding the Tank with Decorations
While decorations can make the aquarium look attractive, adding too many rocks, plants, or structures can reduce the swimming space available for turtles. Aquatic turtles are active swimmers and need open areas to move freely.
Overcrowding the tank with decorations can also trap debris and make cleaning more difficult. It is best to keep decorations minimal and focus on providing a spacious environment where turtles can swim comfortably.
Ignoring Regular Maintenance
Even with strong filtration, turtle tanks still require regular maintenance. Skipping water changes, neglecting filter cleaning, or ignoring debris buildup can lead to declining water quality over time.
Routine tasks such as partial water changes, removing uneaten food, and checking equipment ensure that the tank remains clean and stable.
Avoiding these common mistakes makes turtle keeping much easier and helps create a healthier environment where turtles can thrive. A well maintained 75 gallon turtle tank can provide a safe and comfortable habitat for many years when set up correctly and cared for consistently.
Final Thoughts
A well designed 75 gallon turtle tank setup provides an ideal environment for many aquatic turtles.
With proper filtration, lighting, and regular maintenance, a 75 gallon aquarium can support healthy turtles for many years.
By investing in strong filtration systems and providing a proper basking area, you create a habitat that closely mimics the natural conditions turtles need to stay active and healthy.
FAQ Section
Is a 75 gallon tank big enough for a turtle?
Yes. A 75 gallon tank can comfortably house many adult aquatic turtles such as the Red‑Eared Slider, although larger species may eventually require larger tanks.
What filter should I use for a 75 gallon turtle tank?
Choose a filter rated for at least 150 gallons to handle the heavy waste produced by turtles.
How deep should the water be in a turtle tank?
Water depth should generally be at least twice the turtle’s shell length, allowing the turtle to swim comfortably.
Do turtles need UVB light in aquariums?
Yes. UVB lighting is essential for proper calcium metabolism and overall shell health.