
A properly installed canister filter is one of the most powerful upgrades you can make for stable turtle tank filtration. When set up correctly, it dramatically improves water clarity, biological stability, and long-term tank health.
Here’s exactly how to install it the right way.
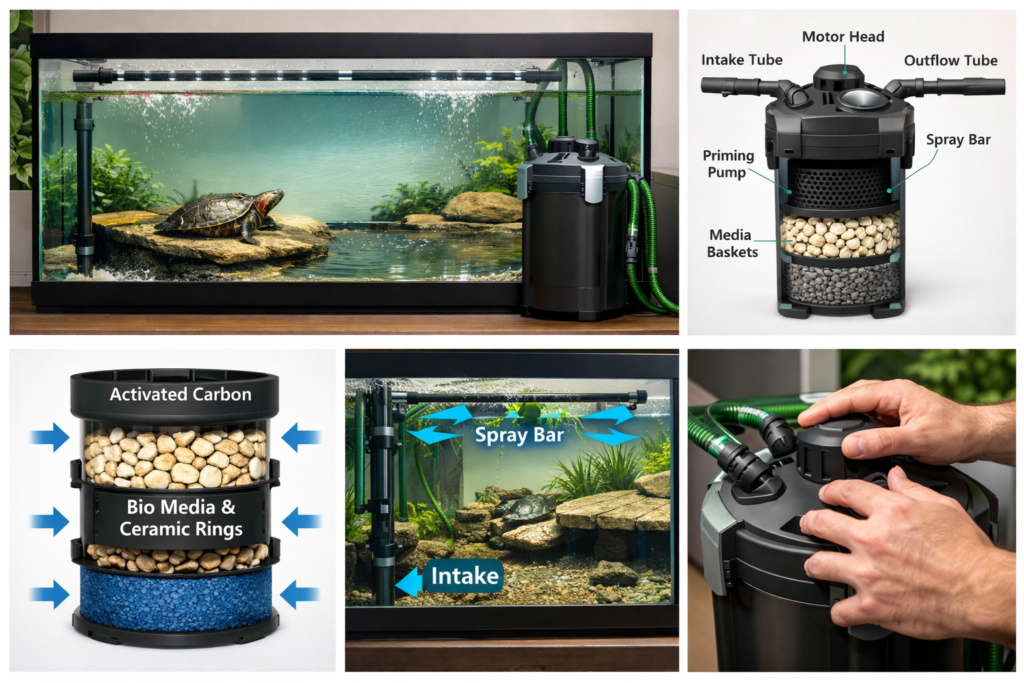
Step 1: Position the Canister Below the Tank
Canister filters rely on gravity and suction.
• Place the unit below the aquarium (usually inside the cabinet)
• Keep it upright and level
• Ensure easy access for maintenance
Most manufacturers recommend keeping the canister at least 8–12 inches below the tank base for optimal flow.
If you’re still deciding which model to use, I’ve broken down the most reliable and turtle-safe options here:
Choosing the right model first makes installation much easier.
Step 2: Install the Intake and Output Tubes
Attach the intake tube inside the tank:
• Position it near the bottom (but not touching substrate)
• Keep it away from basking areas
Attach the output tube:
• Aim it toward the tank wall
• Or use a spray bar to distribute flow evenly
This helps maintain strong turtle tank filtration while preventing excessive current that could stress your turtle.
Step 3: Layer the Filter Media Correctly
Inside the canister, media is usually arranged in baskets.
Typical order:
Bottom layer → Mechanical media (coarse sponge)
Middle layer → Biological media (ceramic rings or bio balls)
Top layer → Fine sponge or optional carbon
Mechanical media traps debris.
Biological media supports beneficial bacteria.
For turtle tank filtration, biological capacity is the most important factor — don’t skip it.
Step 4: Prime the Filter
Most modern canister filters have a priming pump.
• Fill the canister with tank water if required
• Pump the primer until water begins flowing
• Plug the unit in
Check for leaks before closing the cabinet.
Water should begin circulating smoothly within seconds.
Step 5: Adjust Water Flow
If the current feels strong:
• Use a spray bar
• Aim output toward the glass
• Add décor to break flow
Remember, strong biological filtration is good. You’re adjusting water movement, not reducing filtration power.
Step 6: Let the Nitrogen Cycle Establish
Even with powerful turtle tank filtration, beneficial bacteria need time to grow.
• Avoid overfeeding during the first weeks
• Test ammonia and nitrite
• Perform partial water changes as needed
Never rinse biological media under tap water — always use tank water to preserve bacteria.
Setting up a canister filter properly ensures:
✔ Strong mechanical waste removal
✔ Stable biological filtration
✔ Fewer ammonia spikes
✔ Cleaner water long term
If you’re unsure which model fits your tank size and turtle species, I’ve created a detailed breakdown of the most reliable options here:
Choosing the right canister from the start makes turtle tank filtration far easier and more stable in the long run.